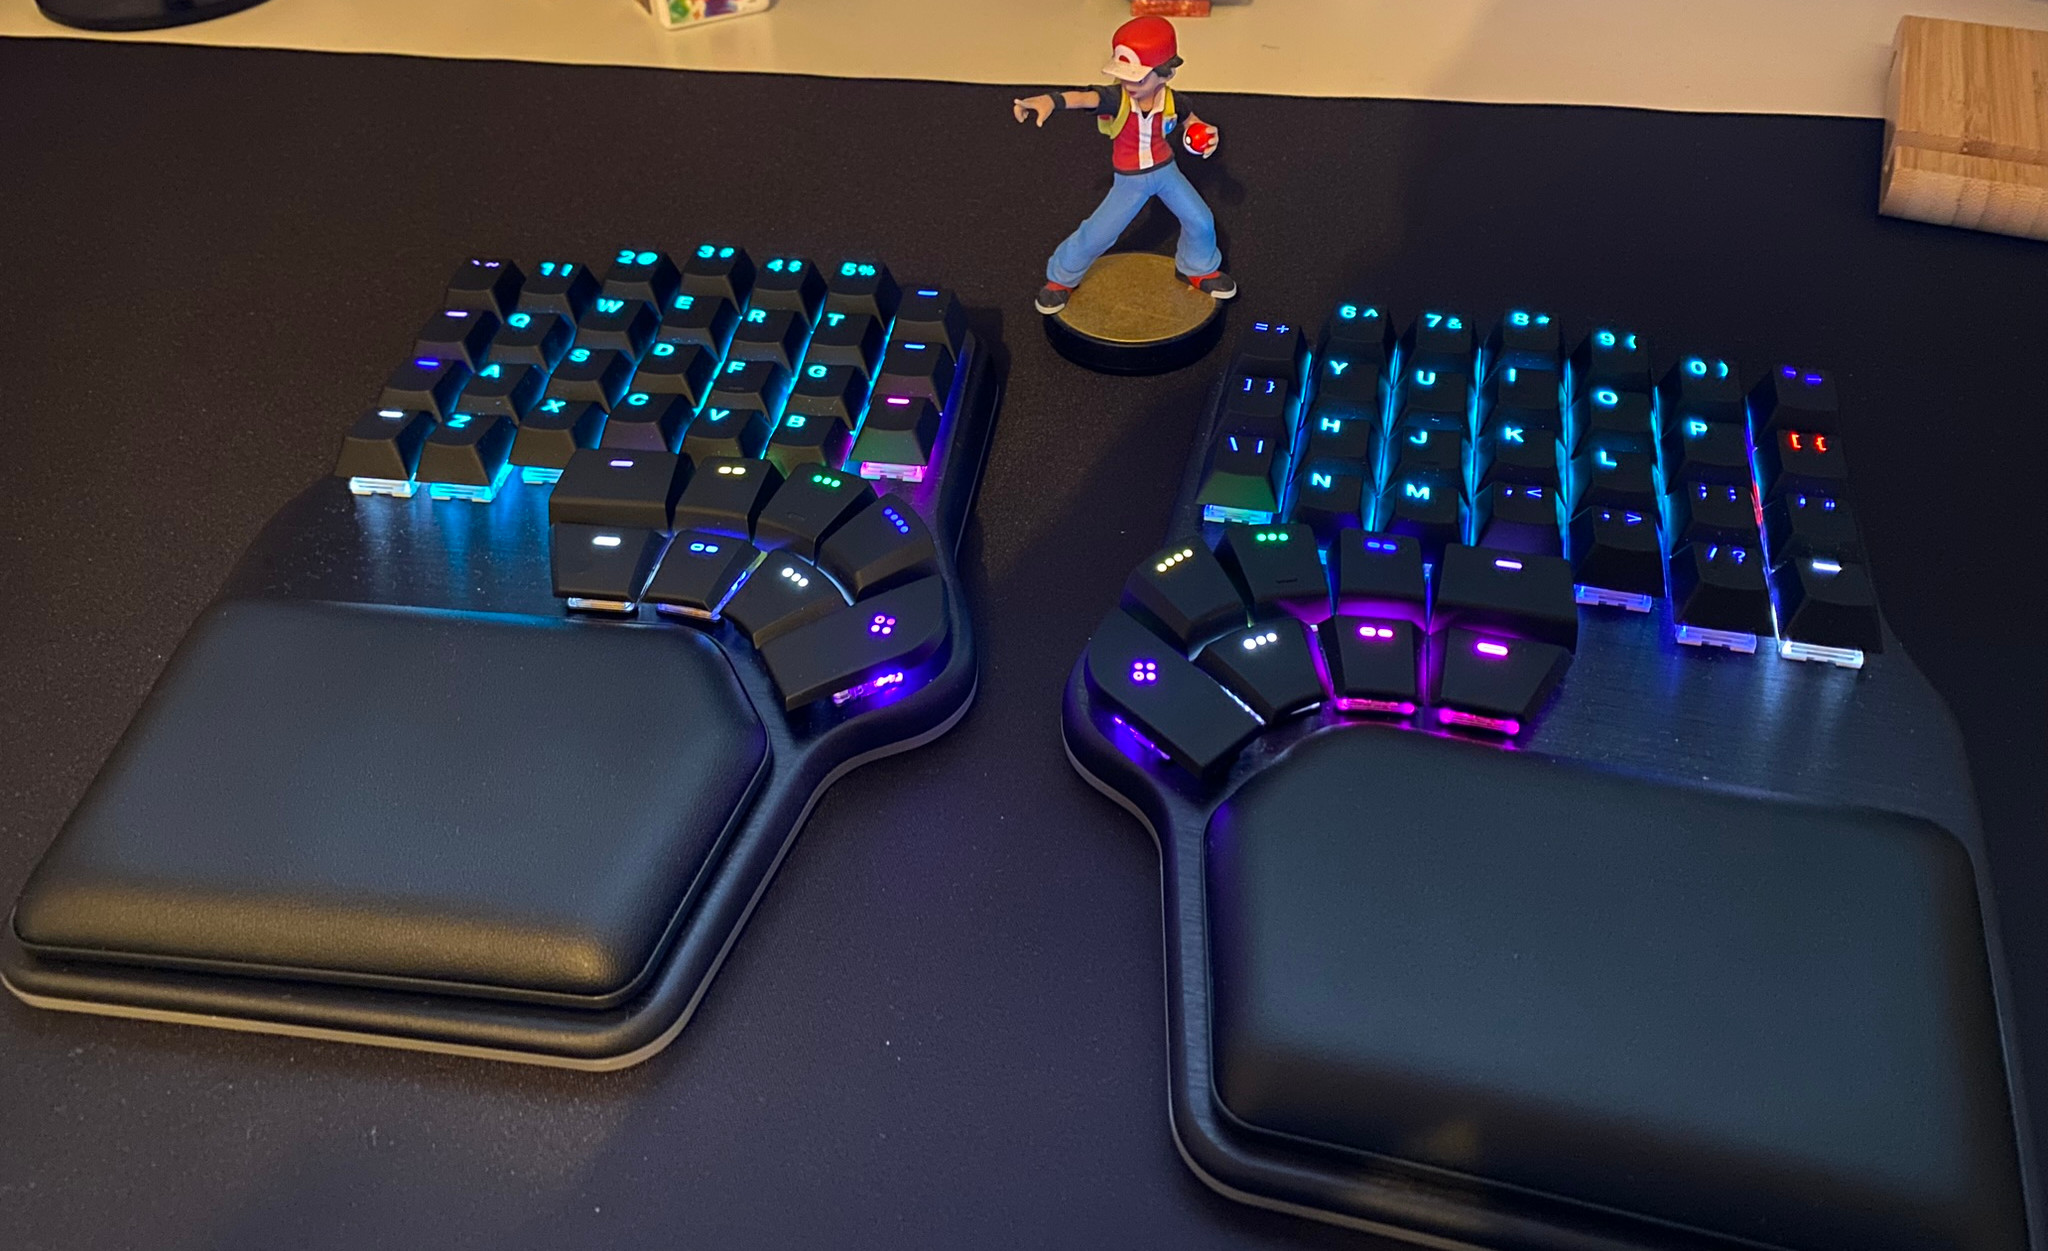
Almost a year ago, on the last day of 2023, I received my final gift of the year. As someone who uses keyboards over 10 hours a day, I had long wanted to try a better one. One I can use my arms wide open, one that feels better and is customizable to my liking. Not being a huge ergomech hobbyist 1 myself, but more of a trying-to-be-informed customer, I wanted to get that “end game” keyboard I’ll want to use for many years to come.
Now it’s been a year since getting my first programmable column-staggered split keyboard (what a list of adjectives), the Dygma Defy, I thought maybe it’s time to share what I think of it, and the general experience of using such keyboards for us mere mortals.
So, what’s it again?
Dygma Defy is a programmable, wireless (Bluetooth and RF), split, column-staggered keyboard made by the Spanish company Dygma and initially started as a Kickstarter product. It features a 16-key thumb cluster, an (optional) tenting feature, and underglow RGBW on an aluminum case for added bling bling ✨.
It’s normal if you don’t know what those words mean. Let’s parse their meanings together:
Programmable
The keyboard has built-in memory where you can set what every key does, on 10 virtual layouts (called layers), stores macros, one key can have up to 5 functions, and so on. Lots of customization that is written to keyboard’s memory and comes with you to any computer.
This is much more advanced than what companies mean when they say “programmable”. By being able to change how each key behaves and being able to make key combos and different layouts, you can practically make 10 keyboards and carry them around as if it’s one. QWERTY to COLEMAK, English to German, a gaming keyboard that mirrors your keys and moves important ones under your thumb, a macro keyboard where a single button press does a lot, all and more is possible and you can switch between them on-the-fly.
I’ll talk more on this later on. Let’s move on for now.
Wireless
Self-explanatory. Cool thing about this one is that is supports both RF for low latency and Bluetooth up to 5 devices. I use RF to my gaming PC and Bluetooth to my Mac. Bluetooth is good for work, but I can easily tell the difference in latency compared to RF when I game.
Split

When you look up articles on ergonomy, do you see pictures like this one and wonder how their arms somehow perfectly align with the keyboard? Because I do.
Unless you are a perfectly horizontally keyboard-sized human, your arms won’t align to the keyboard, leaving you to permanently close your arms use the keyboard at an angle.
For solving this, split is a big deal. It means your keyboard is split in half to two sides. It is a big deal because now you don’t have to shape yourself to the keyboard’s shape, and instead place the halves where your arms naturally are.
You can finally wide open your chest, and look like the people in those pictures. After a year of use, now using a laptop keyboard for 10 minutes feels unnatural and bad to me. It also feels better for games because you can move one side away and replace it with the mouse. This was one of the biggest selling points for me.
One other minor advantage is that since now you have a large empty space in the middle, you can put a trackpad, laptop, iPad, or a cat there. 🙂
Column-staggered
On a normal keyboard keys are staggered, as in they are slightly to the left or right of each other, because of how typewriters used to work back then.
A column-staggered keyboard has a key layout where keys are vertically staggered instead of horizontally. This makes finding the keys easier, makes touch typing feel natural, reduces unnecessary finger movement, and takes into account that your fingers aren’t of equal size, to improve comfort. The column that sits under the middle finger is the farthest away, and the keys under pinkies are the closest.
Thumb cluster
Instead of one key (spacebar) under your thumbs, now you have up to 16. The idea is that your thumbs much more capable and flexible to be wasted on a single key, and by having more keys under it you can reduce the stress on your other fingers flexing to reach far away keys.
This is where you usually put your “special” keys like CTRL, ALT, ENTER and such, if you were surprised by the lack of those keys in the picture above.
There is also a fun blog post over on Dygma’s blog on how they reached their current design. I’ve read for some people while this reduces strain on other fingers, it increases on the thumbs. For me, after a year that hasn’t happened, and I find it more comfortable to have a thumb cluster. I use the top three keys + the long key the most, which makes 8 keys in total. Other 8 I’ve bound them to less used functions, such as layer switches, MENU key that I never press etc. (Crazy that we’re still stuck with that key on most standard keyboards)
Tenting
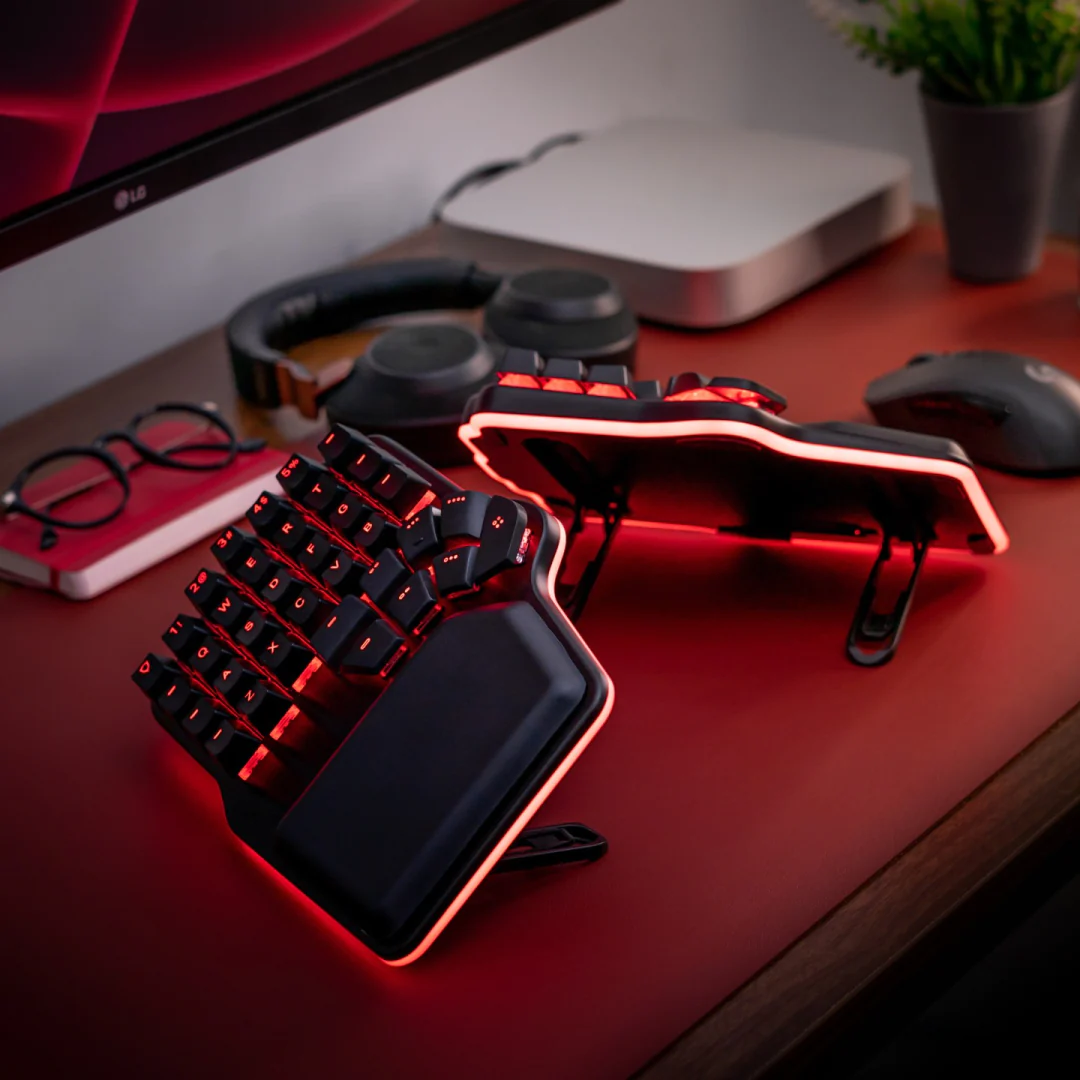
This is the ability to hold the keyboard at an angle, instead of it facing straight up. Idea is that naturally you don’t keep your hands and wrists completely horizontal for long periods of time, and usually we keep our hands at angle while resting.
Preferences on tenting vary a lot. Some swear by it and use their keyboards at very high angles, up to 60° is possible with a Defy, and others prefer more conservative angles. I found 10° the perfect angle for me, where I can reach the keys with more ease and my wrists have less pressure.
A picture is worth a thousand words
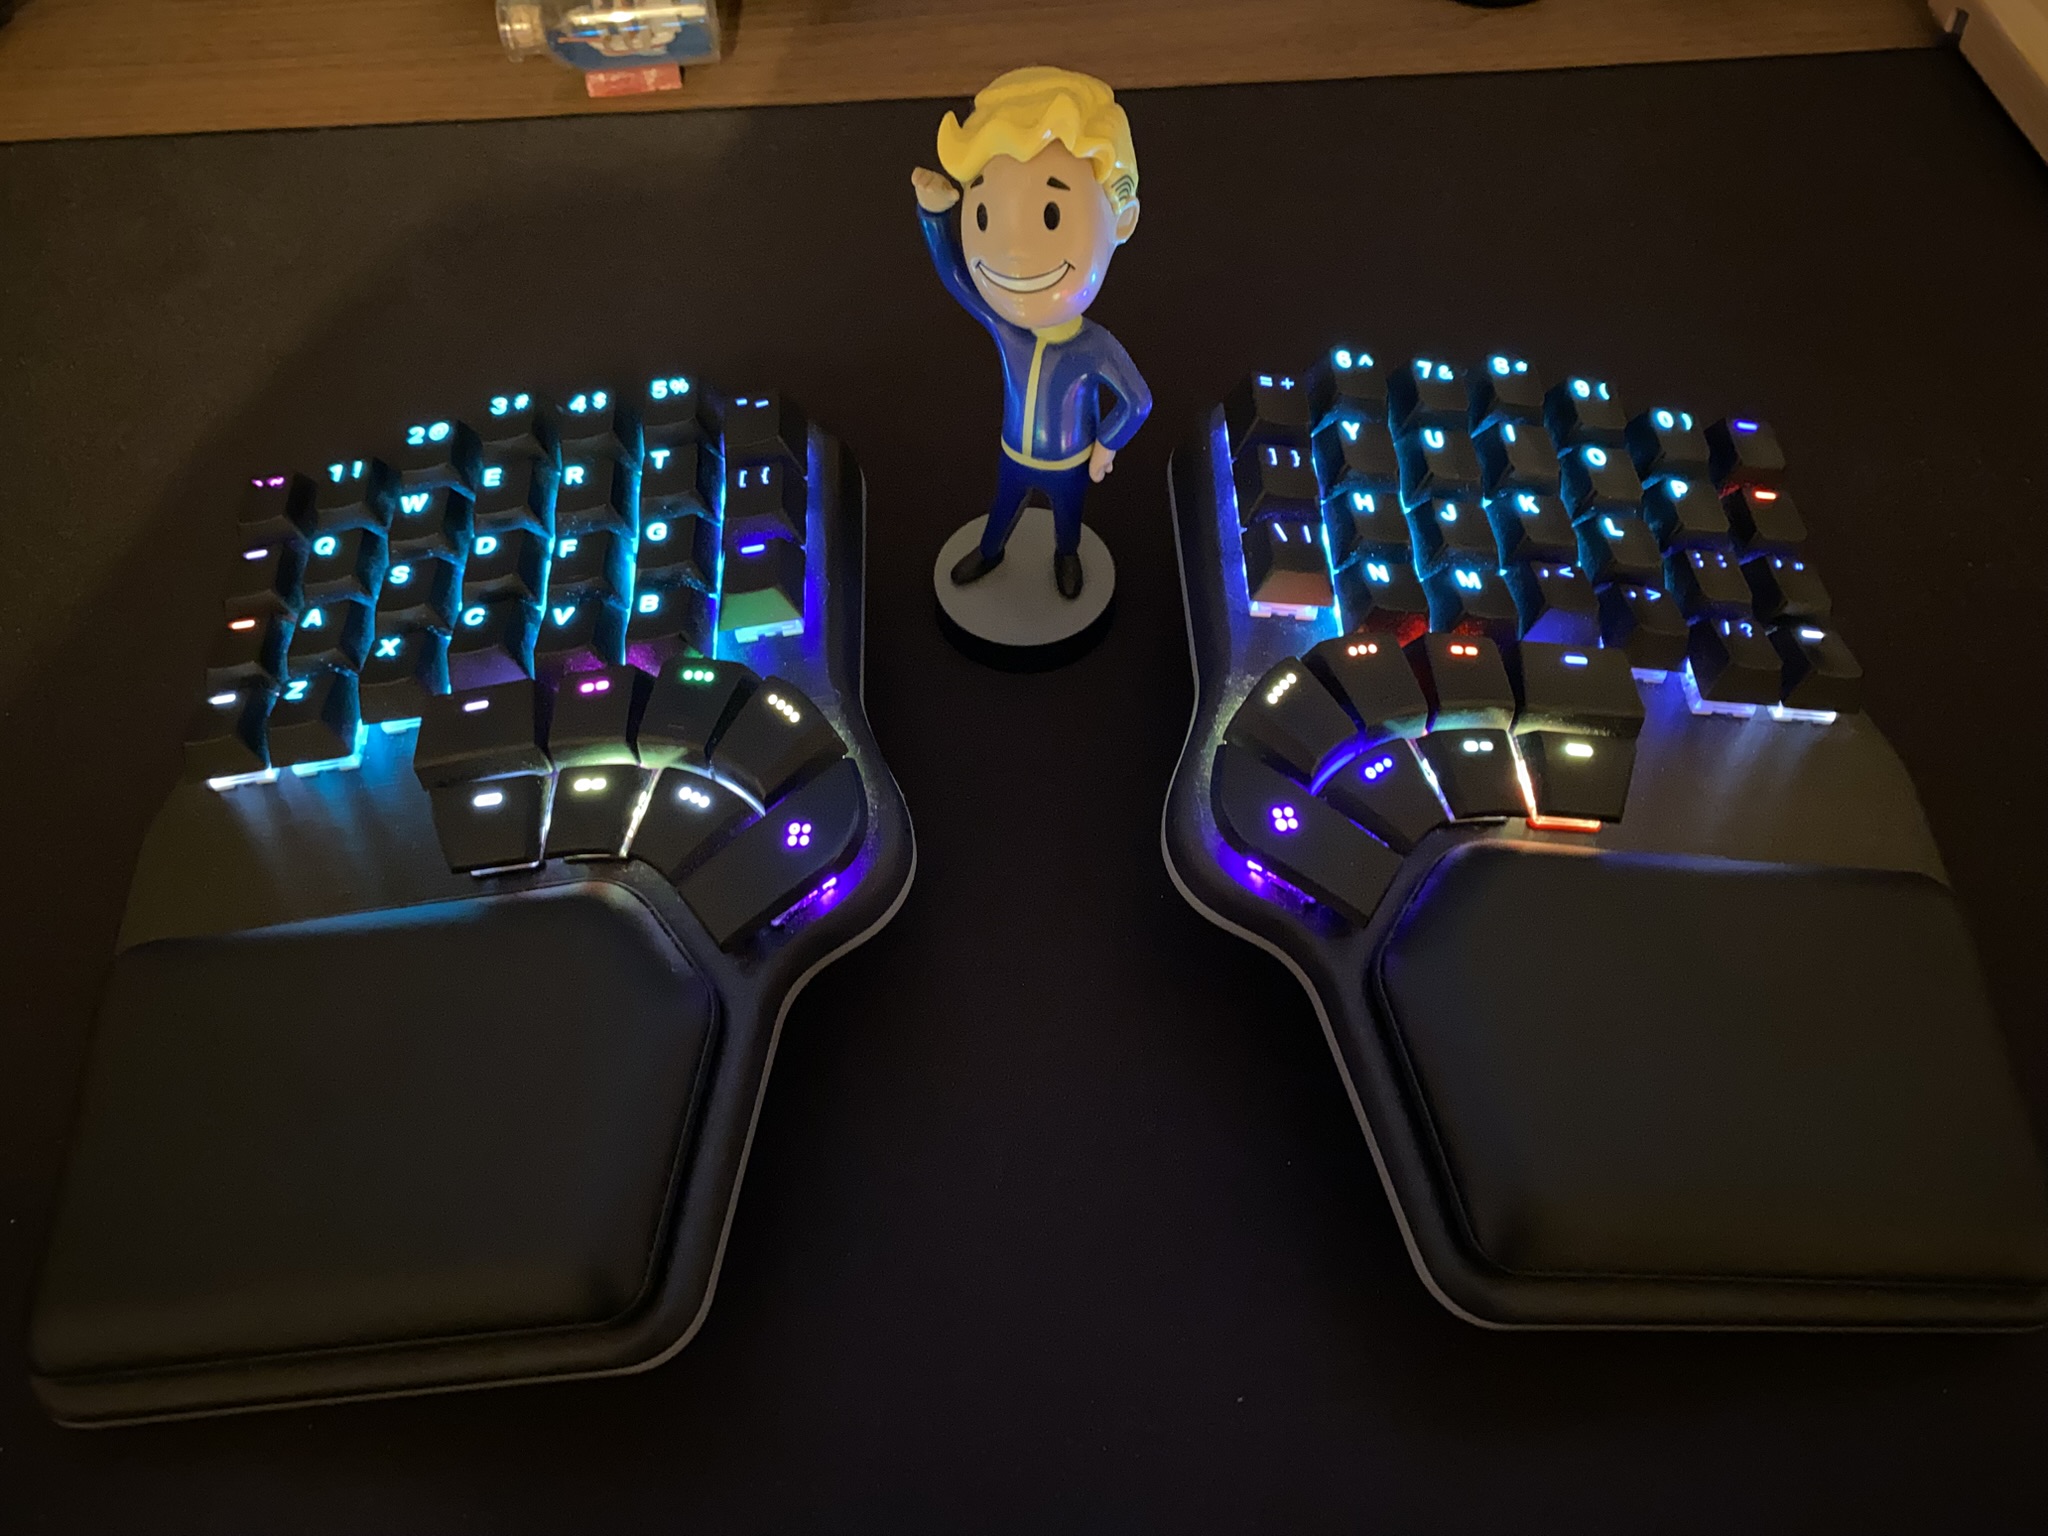
Here in the picture you can see my Dygma Defy tented at 10° angle. No wires to be seen, keys are staggered by columns roughly in shape with fingers, and each side of the keyboard moved a little together than usual so they fit the picture.
Bringing it all together, all these fancy features are there for one reason: comfort. Because it’s customizable in so many ways, by trial and error one can bring together the ideal keyboard.
(Sorry for the blurriness, it works well to hide the dust though! 😅)
My Setup
Okay but how do I use it?
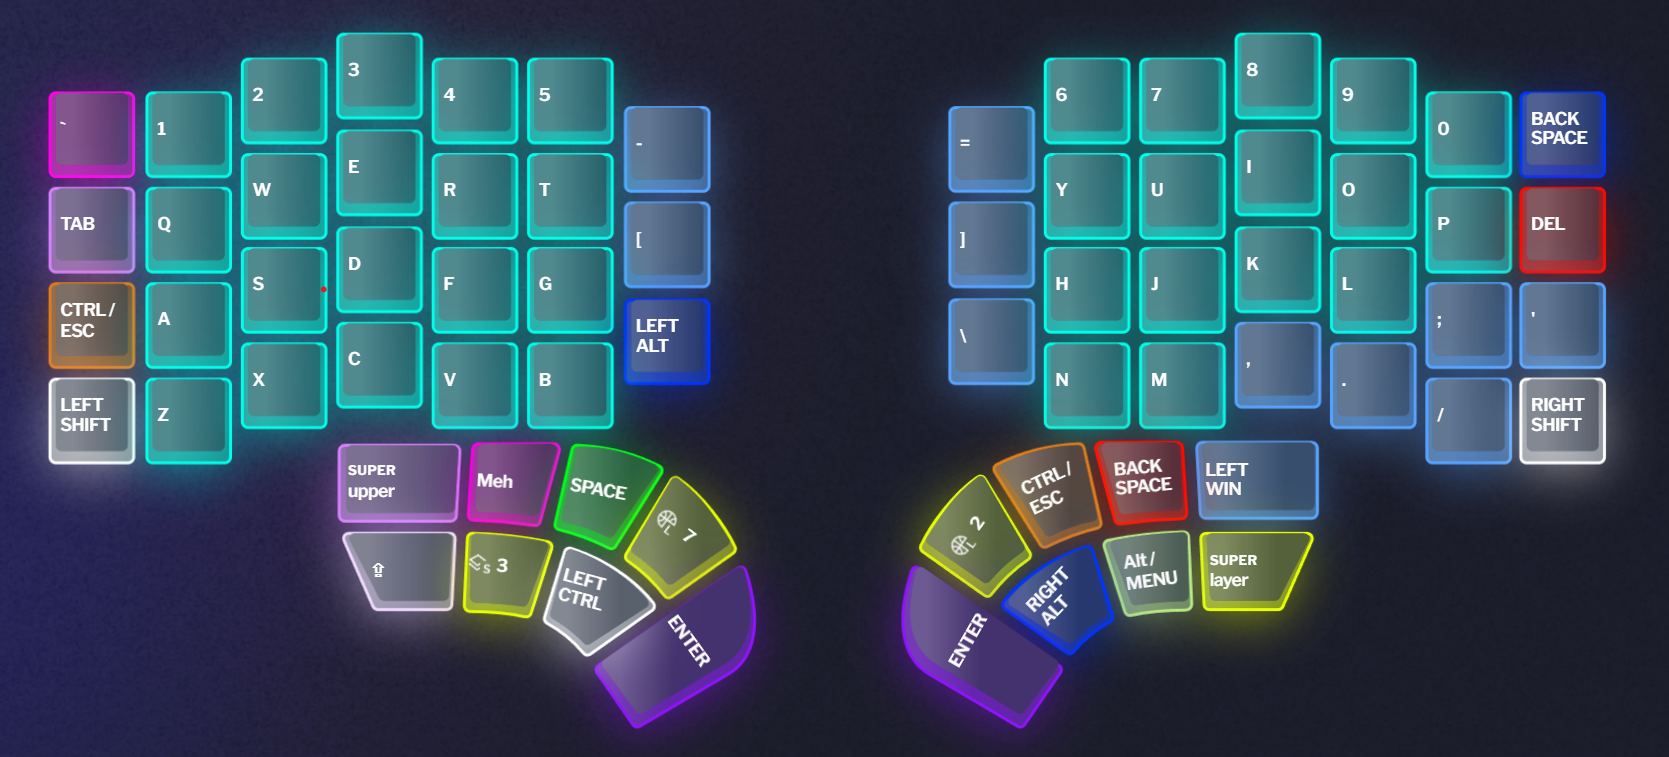
The picture above is my main layer, this is how the keyboard layout is in its default. The concept of layers is pretty important for programmable keyboards. Especially because they tend to have not as many keys as traditional ones, and are very focused on not moving your fingers away from the home row.
The ELI5 for “what is a layer” is basically you don’t have 1 keyboard, you have 10 virtual keyboards with their own layouts that you can switch between at anytime.
You can have a QWERTY and COLEMAK layout at the same time, or press one key and all your inner keys become symbols, or your left and right side letters switch, … possibilities are near endless. You can program 10 different keyboards and switch between them.
First, check the picture above.
Okay if you checked out the picture above, I think some explanation is in order here:
- The letters and the symbols are obvious, they are the keys in cyan and light blue.
CTRL/ESCis a dual-function key. If the key is held it acts asCTRL, if just pressed it isESC, both are very often used especially for Vim users in terminals. I’ve already been using this with Karabiner, now I no longer need additional software that time to time breaks with Mac updates.Mehkey is specifically selected because it’s a combination ofLeft Control + Shift + Altwhich would be a pain on a standard keyboard and thus not used by pretty much any software. Since we can bind all that on one key with Defy, I use it as a practically unique key that I can bind to anything in any application and it never conflicts with an already bound key.upperis a special key 2 that if held, takes me to my Gaming layer. If only pressed takes me to my Macro layer, I’ll talk about them more below.🌐 7takes me to my Symbol layer, where symbols and numbers are brought much closer to the home row. This is useful while programming.🌐 2takes me to my Navigation layer. This is where I have keys for an emulated mouse, and arrow keys. Emulated mouse is pretty cool for its mouse wheel, I can scroll through Web pages not needing to reach for the mouse. Scrolling works much smoother with an emulated mouse wheel than arrow keys or PgUp/PgDown.S 3takes me to my System Layer, this is where I have the F1 through F12, media keys for music, a few keyboard-related keys, Print Screen and a Toggle HDR on Windows macro key. 3layeris another special key that if pressed replaces English keys with German accented ones. If pressed again returns back to English. If held, right side becomes a numpad.- I love this feature, eventhough it only works on Windows for now. It lets me write in two languages without having to change input methods.
- I have two backspaces, one in the thumb cluster and other at the top-right. This is an experiment I’m currently doing to see which one I prefer more.
So, all in all while there are physically less keys on a Defy, there is much more functionality you can get from those keys. It feels like you have many more keys than a regular keyboard. As a result you move your hands much less, but get more done.
Also I haven’t invented many of these keys and layers myself, Defy came with a reasonable set of defaults, I simply extended and changed it to my liking. If you like, let’s go over them one-by-one to see what is possible. (or if you feel like this post is starting to be too long, just skip over to next section – I won’t mind. :))
The Gaming layer
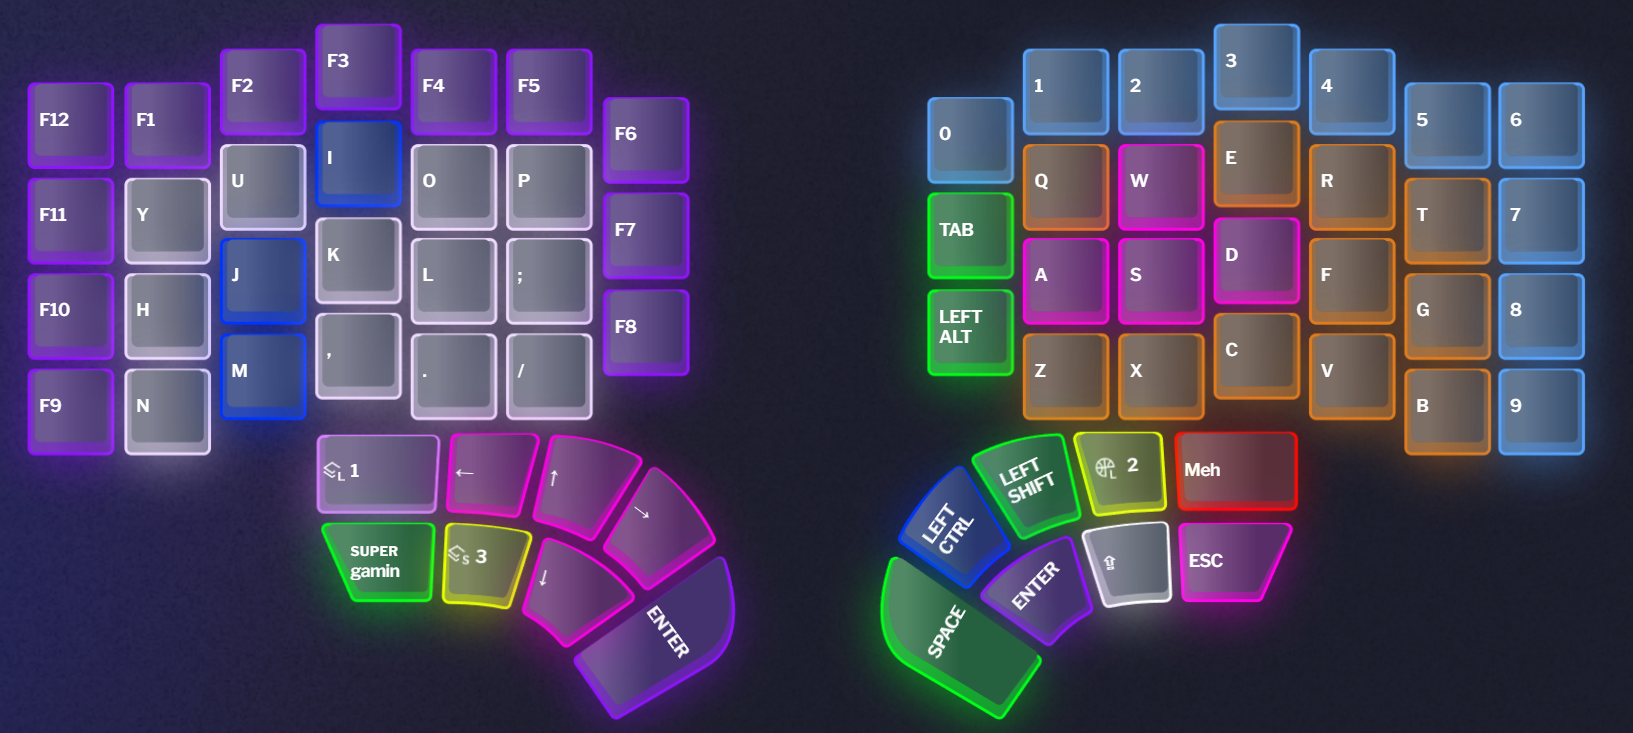
I have a bit of a rare condition: I’m left handed. 😅 Also, I hold the mouse with my left hand. 🤯
This means on a traditional keyboard, if I play with WASD I’m in an extremely cramped position. Both my arms meet at the left edge of the keyboard. I would either have to map controls in every game, or move the keyboard so much more to the right, which isn’t really feasible even on my pretty large desk.
Instead now when I switch to my Gaming layer, keys are mirrored. Games usually heavily use the keys that fall on the left, so I map them to the right and hold the mouse in my left hand instead. All the often-used gaming keys such as CTRL (crouch), SHIFT (to run), SPACE (jump) are right under my thumb, where they are the most accessible. I don’t have Windows key here so I can’t accidentally hit it either. 4
This has been way more comfortable for me to use, as now I can play games arms wide open. I also find it a little more natural and immersive. Also works well for sim games.
The Navigation Layer
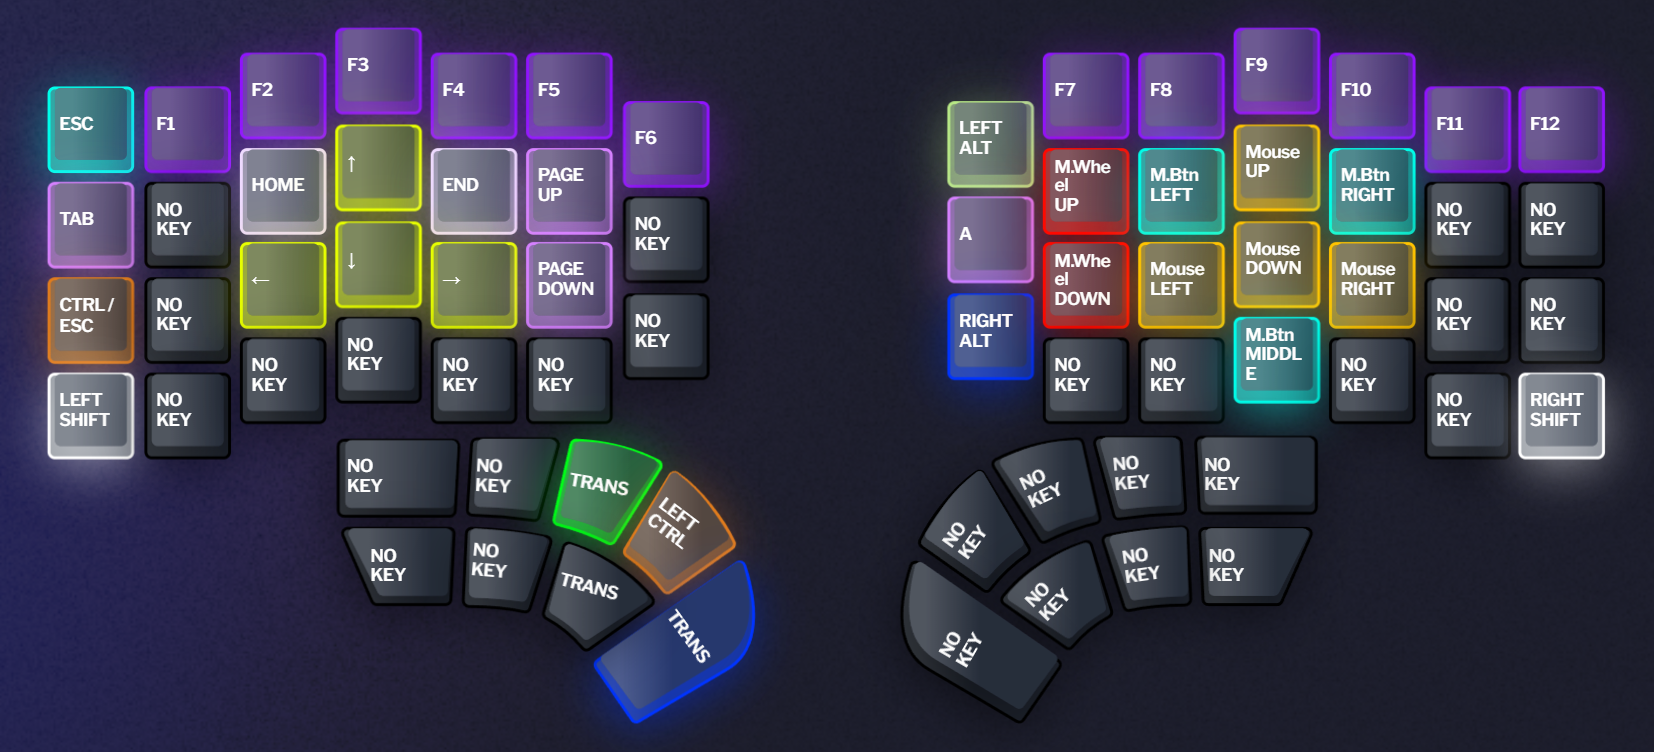
The Navigation layer is where I have shortcuts and arrow-keys to navigate between Mac windows, tmux panes, neovim panes, and any application that uses arrow keys. I also have HOME, END, PgUp, PgDown and F-keys here when I need them.
For me the hero of this layer is the emulated mouse on the right, especially the scroll wheel. This scroll wheel works so much smoother for browsing web pages than using arrow keys or PgUp/PgDown.
I also have a real ESC key here (instead of CTRL/ESC dual-function one in the main one), in case I need to hold ESC. I needed it a grand total of 0 times in a year.
The System Layer
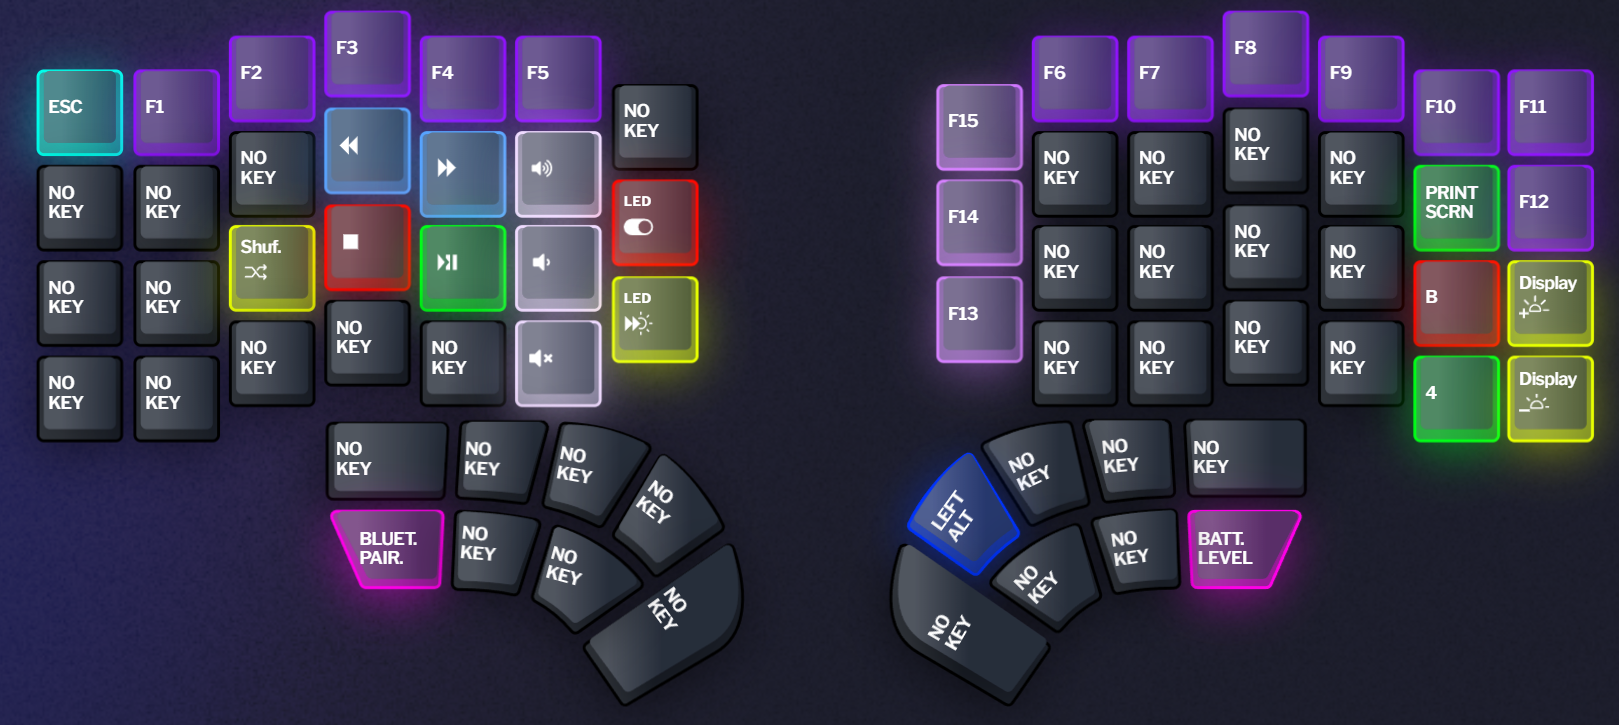
Ths is the place where I have less used but important functions related to the computer or the keyboard. It’s a bit like a utility drawer.
To the left:
- I have the music and volume controls in the home row. Very easy to use.
LEDbuttons are to turn on/off keyboard LEDs and switch between animations that I never use.BLUETOOTH PAIRkey is important, I use it to switch between devices or switch to USB or RF.
To the right:
F13..F15buttons that I can bind to any shortcut, knowing that they wouldn’t be used because normal keyboards don’t have them.- Two print screen buttons (green ones) one for Windows, one for Mac.
- If only we could set conditional buttons depending on OS or Device… One can dream.
- Windows HDR toggle key (the red one)
- Display brightness control keys.
BATT. LEVELkey that makes the keyboard show its remaining charge of built-in battery.
The Symbol Layer
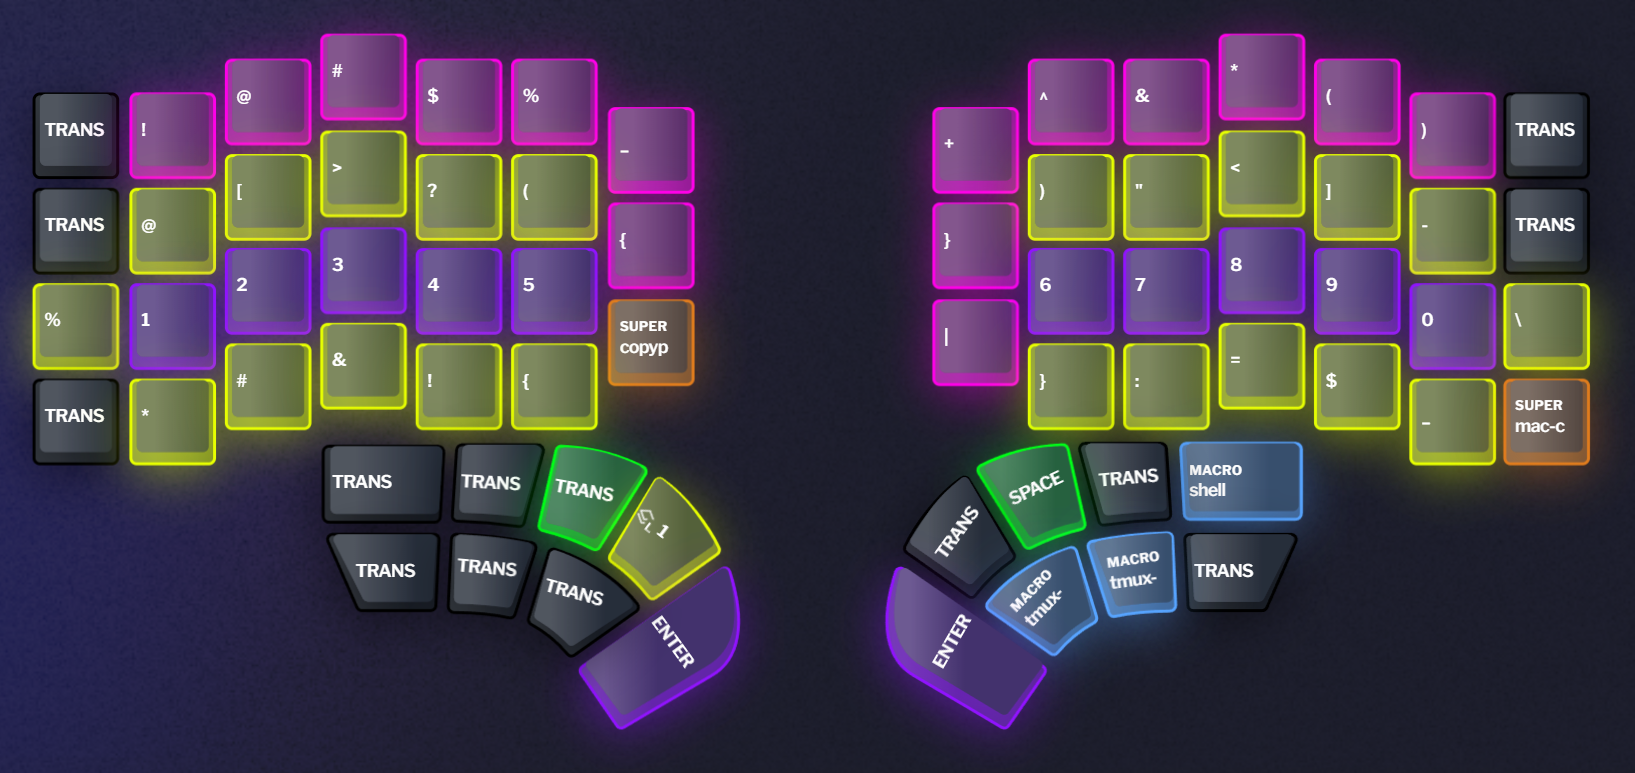
The Symbol layer is a pretty simple idea: when I hit a special key, all keys in my home row are replaced with most commonly used symbols and numbers, so I don’t have to move my hand to use them.
Only special keys here are copy-paste keys for both Windows and Mac, and a few Macros that I use so little I don’t remember what they do.
I have to admit that after a full year I still haven’t learned all the keys in this layer, and while I find it useful for some keys, often I find the cognitive load of changing my habits heavier than the benefits I may get.
There are many others who use it though, and I can tell that they have better thought-out layouts than mine.
The Macro Layer
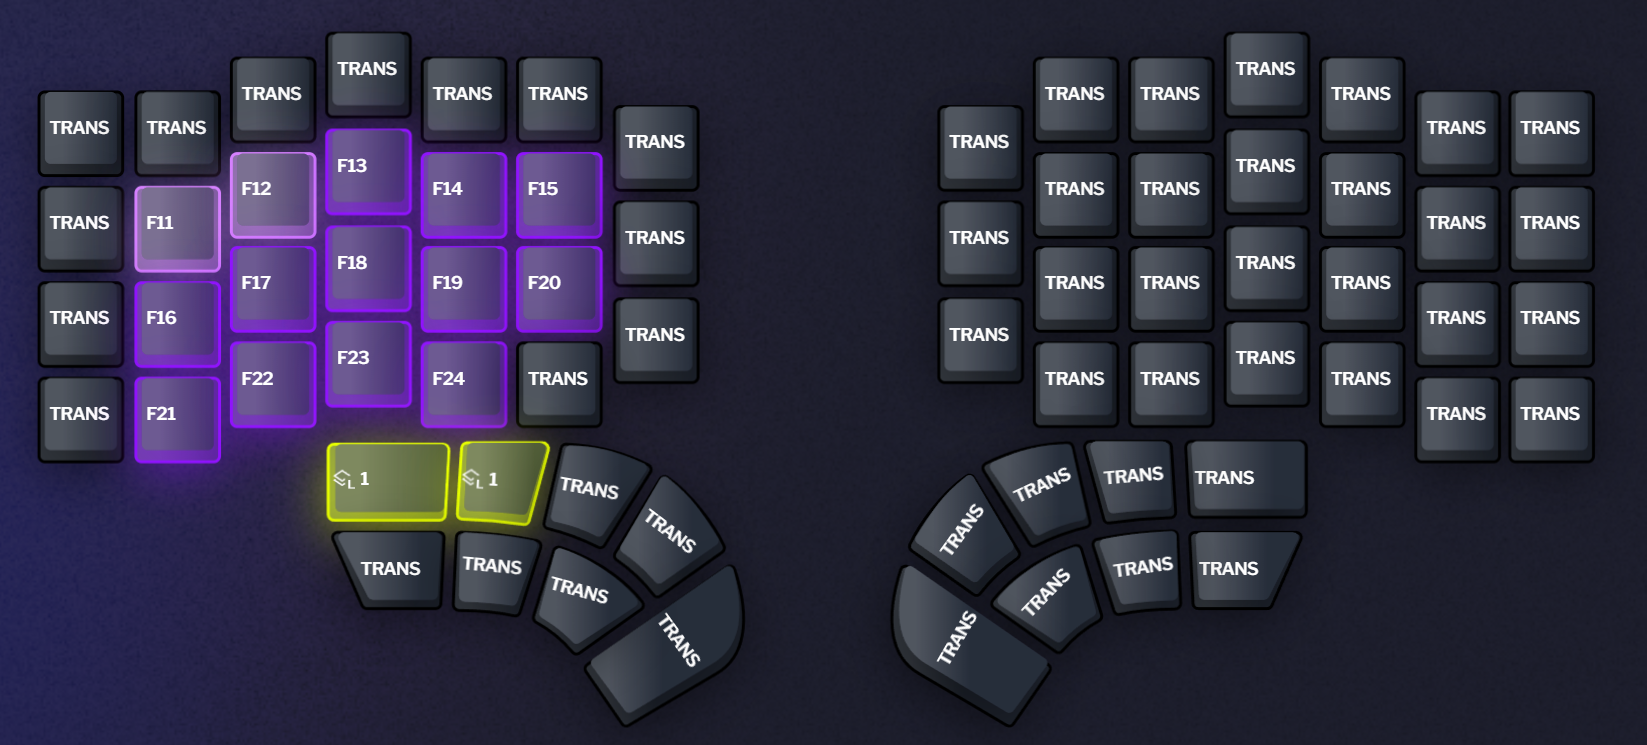
Here I’ve bound from F11 to F24. Since normal keyboards don’t have keys after F12 these keys are practically guaranteed to be not bound to anything. I use them for different functions across operating systems and apps.
For example on Mac I use Raycast where F13 pops confetti on the screen (a neat party trick for screen sharing), and F14 through F16 switch to Chrome, My Terminal etc.
Other Layers
There isn’t much to say about them so I’ll just mention them:
The German Layeris where I have the keys that print German umlaut characters. I don’t often write in German, but when I do it’s way better than fiddling with input methods or googling forgerman eszettand copy pasting it. 😅The Numpad Layerthat puts a numpad in the right side. I practically never use it, it only serves as an assurance that I could.- Two empty layers where I couldn’t think of a useful feature, so they don’t have any bound keys. Creative ideas are appreciated. 🙂
“Programmable”
While I use the word “programmable”, Defy isn’t as programmable as many DIY kits you’ll find out there where you can flash open-source firmware such as QMK and ZMK and actually write code and features for the keyboard yourself. Defy is technically open source, and runs a modified version of the open source firmware Kaleidoscope, though I don’t know of anyone who runs custom firmware on it.
Upside is Defy has nicer UX, much easier to iterate on configuration through Bazecor UI, supports RF (ZMK doesn’t) and has full control of the experience. The downside is you don’t have that much control of the experience. I have to admit that I’d much be happier if they were to adopt ZMK and contribute their RF work upstream.
Switches
I have switched 5 from Cherry MX Blue’s on my previous mechanical keyboard to Kailh Silent Pink’s on Defy. I can write a lot about what is different between these two switches, but this comparison table at Rtings.com sums it up: they have nothing in common other than being a keyboard component.
Silent Pinks are linear, have much less resistance and no bump, and well.. they are silent, kinda. This changes the entire feeling of the keyboard, making it much lighter, responsive and quiet, and I have to say, it sparked a new joy of writing in me. They just feel that much better. Of course finding the right switch for you is part of the adventure, so don’t take my word for it, and maybe check the excellent comparison tool Rtings has: https://www.rtings.com/keyboard-switch/tools/table.
If noise is a concern for you, the difference in sound between something like MX Blue and Silent Pink is basically from “my wife hears it from the next room” to “I can take this to an open-plan office and people wouldn’t hate me”. It’s a lot.
Pink switches having less resistance, shorter travel and being much quieter also makes them a much better fit for gaming. In my opinion, it’s very noticeable.
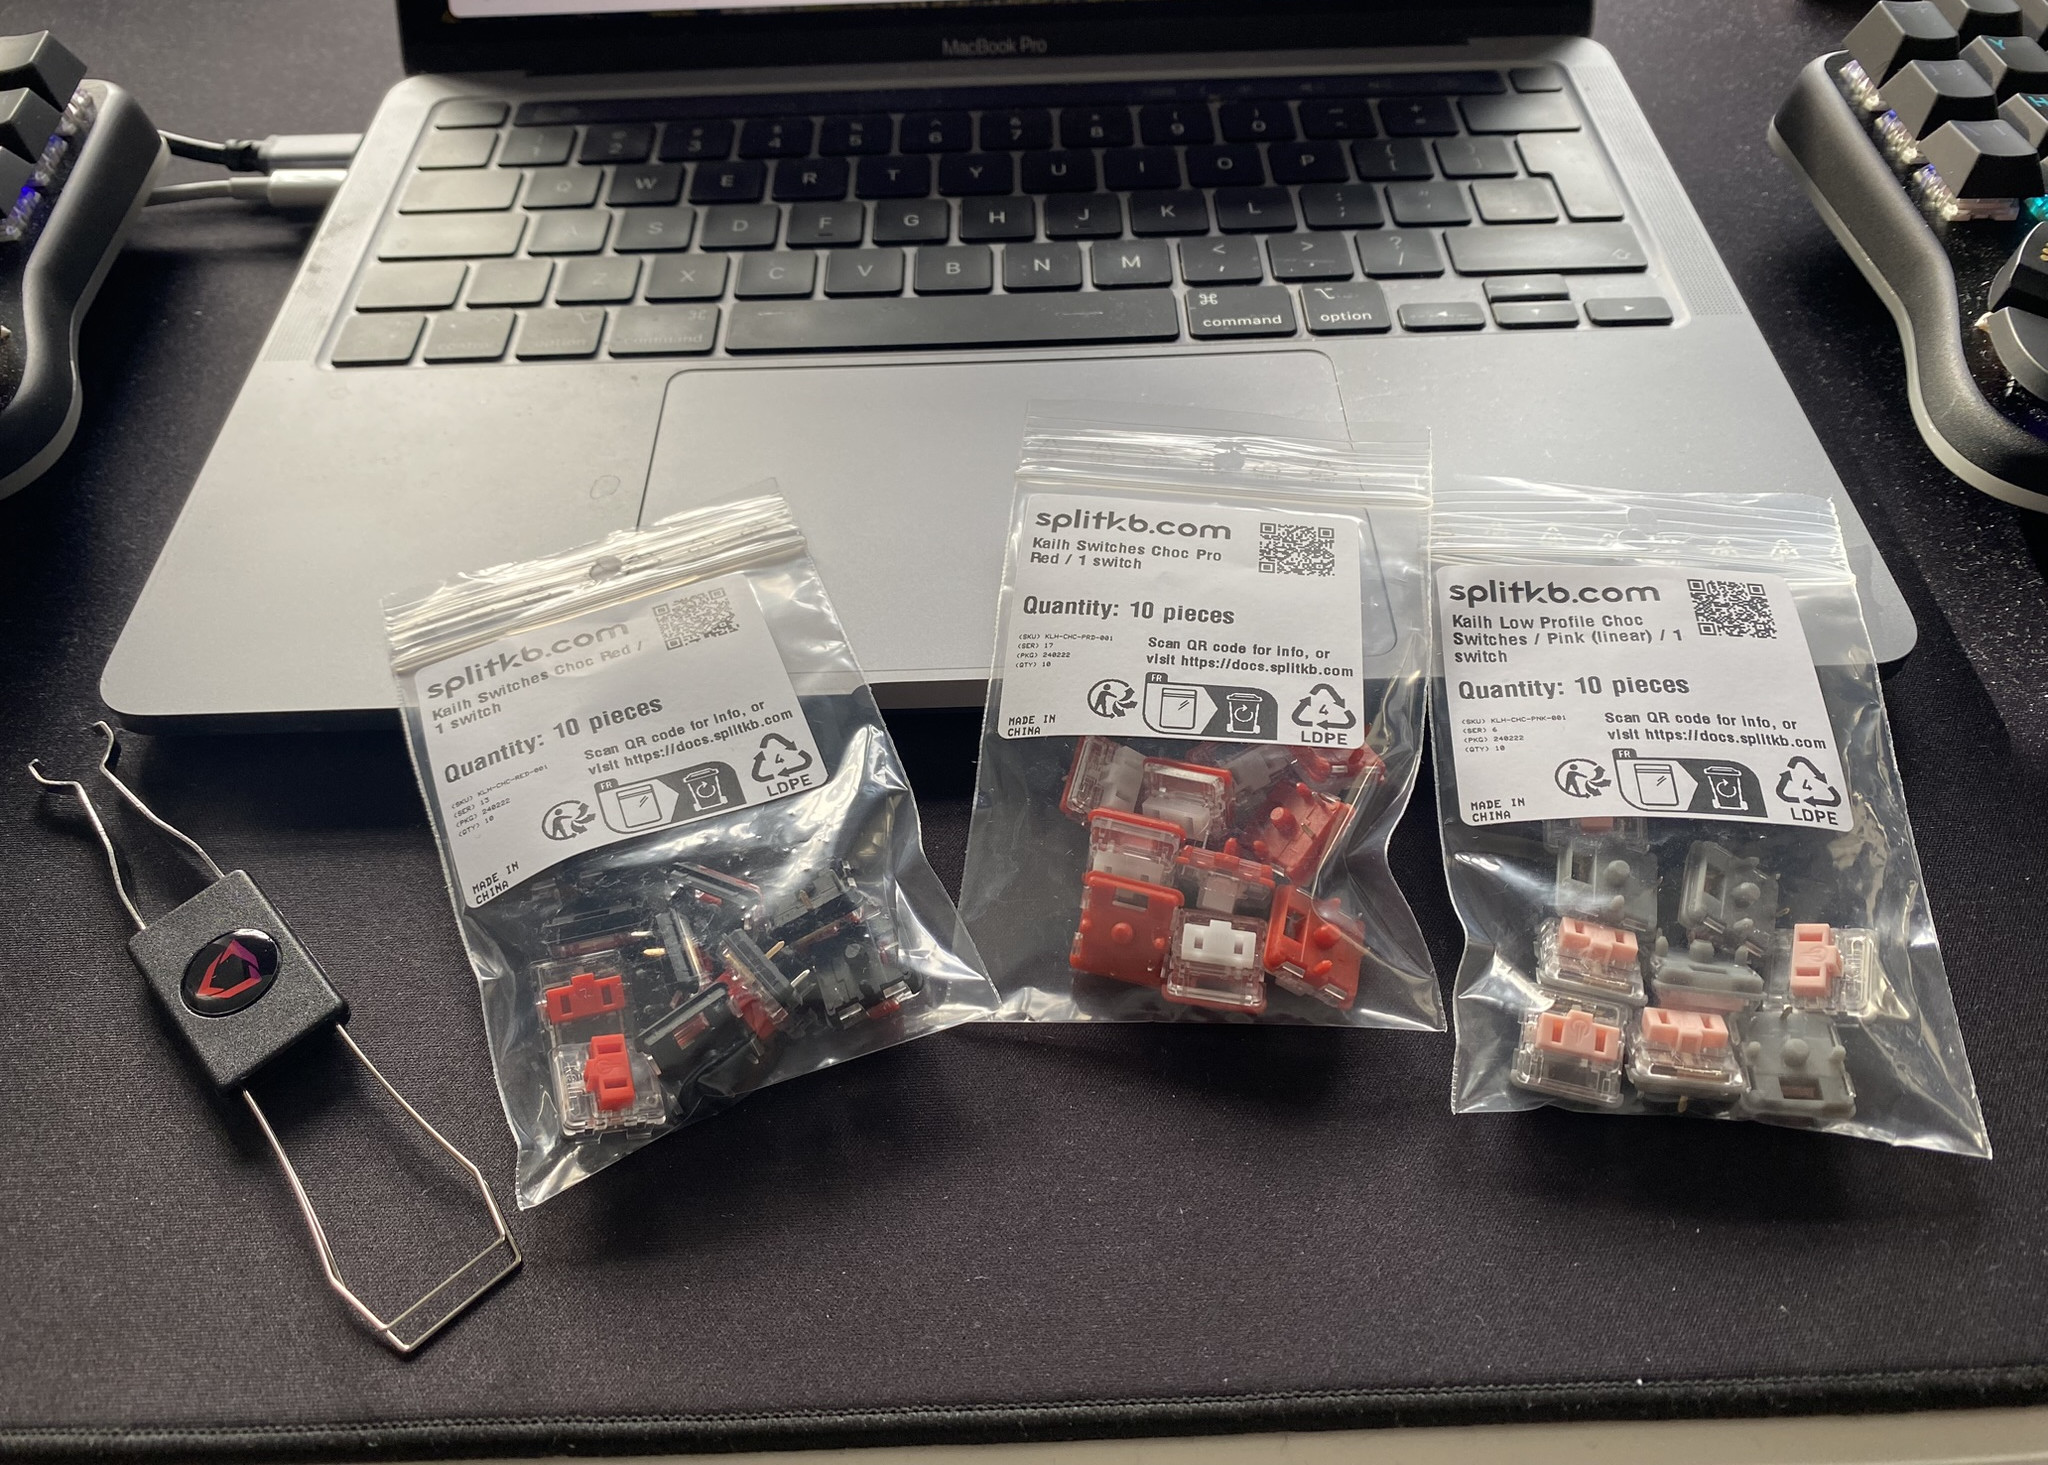
As for Defy, the lower thumb keys (4 keys each side) have different, lower profile switches to make them lower from the rest of the keyboard. For linear switches like mine, Defy comes with Choc v1 Reds. These keys have noticeably more resistance, though them being usually used less, I also kind of enjoy the feel. Just to experiment I got myself a 10-key set of Choc Pro Reds and Pinks as well, to see what feels the best. For now, what comes with Defy seems to be winning.
Getting used to it – or “my first week”
For context, I’ve moved from a standard mechanical Cherry MX Blue keyboard with Turkish Q layout to a split columnar Silent Pink keyboard with English US layout. So I basically changed where the keys are, how the keys are aligned, and sometimes what do they mean, all at once.
Then I noticed, the way I used to write before wouldn’t really work with the split Defy. I wasn’t a touch typist, though I wasn’t a hunt and pecker either. I had a style of my own, naturally developed over the past decades, writing with 3-4 fingers, pressing keys however I find convenient, without looking. This could be an issue, since now the two sides of the keyboard were far apart from each other. I thought of this as an opportunity to learn touch typing, which added another level of challenge.
As you can imagine, that wasn’t exactly easy. I dropped from a comfortable 60 words for minute to 5wpm. First time I used Defy to write something on their Discord, it took me minutes to finish three full sentences. My luck was that I have received Defy on holiday, so I had around 10 days to get used to it before I’d be back to work. I really wanted to use Defy for work, and for that I needed at least 50wpm, otherwise I would be too slow and distracted to be able to get anything done.
To learn touch typing, I used the excellent Typing Jungle program at TypingClub, for the unbeatable price of free. It’s a long program that starts from the very first rules of touch typing, and exercises the user on writing letters, n-grams, long articles, symbols and numbers.
To complement the TypingClub, I’ve also started exercising with Keybr.com which seemed to have the opposite approach. Instead of a structured learning program, Keybr tracks user’s progress according to its algorithm, unlocking new letters as they progress. I have initially started with a 50wpm goal, then raised it to 75wpm once 50 was achieved. The first time I tried Keybr, before taking TypingClub, I was annoyed by how little guidance it offers, so if you’re a touch typing newbie it’s probably best to at least take some lessons from TypingClub before starting with Keybr.
I entirely stopped using my old keyboard, invested around 2-3 hours every day, and around two days in I started using monkeytype to take end of the day tests. These were the results:
| WPM | Raw WPM | Accuracy | Consistency | Chars | Mode | Date |
|---|---|---|---|---|---|---|
| 61.20 | 65.99 | 86.81% | 70.85% | 153/5/0/2 | time 30 | 09 Jan 2024 01:08 |
| 54.38 | 55.58 | 89.68% | 71.26% | 136/1/0/0 | time 30 | 06 Jan 2024 23:17 |
| 40.79 | 42.79 | 81.34% | 63.57% | 102/1/0/0 | time 30 | 06 Jan 2024 23:16 |
| 43.99 | 52.79 | 82.19% | 68.74% | 110/9/2/0 | time 30 | 06 Jan 2024 23:15 |
| 41.19 | 51.59 | 82.07% | 61.10% | 103/6/0/0 | time 30 | 05 Jan 2024 16:04 |
| 34.00 | 39.20 | 82.14% | 66.17% | 85/5/0/0 | time 30 | 04 Jan 2024 15:22 |
| 22.80 | 31.60 | 77.27% | 48.85% | 57/7/0/0 | time 30 | 03 Jan 2024 01:35 |
| 15.20 | 26.40 | 77.27% | 41.18% | 38/11/0/0 | time 30 | 02 Jan 2024 15:42 |
While my accuracy suffered, I could somewhat reliably write at 50wpm~ after a week, just in time for the end of holidays. It took me another week to improve my accuracy further.
This one is from February 25th, almost two months after I started using Defy:
| WPM | Raw WPM | Accuracy | Consistency | Chars | Mode | Date |
|---|---|---|---|---|---|---|
| 100.00 | 100.00 | 98.43% | 82.82% | 250/0/0/0 | time 30 | 25 Feb 2024 21:40 |
Okay now I have to admit, this was a particularly good run.
I did one random test almost a year after and the results were:
| WPM | Raw WPM | Accuracy | Consistency | Chars | Mode | Date |
|---|---|---|---|---|---|---|
| 96.39 | 96.39 | 96.05% | 69.13% | 241/0/0/0 | time 30 | 30 Nov 2024 14:23 |
Not bad. I feel nowadays I can write around 90-100wpm consistently, though my speed seem to have plateued at this point. Maybe it means that passively using the keyboard day-to-day doesn’t really contribute much compared to actively training to get faster and more accurate.
Still it’s a significant improvement over the humble 60wpm~ I wrote at before, and speed wasn’t even a priority for me when I got a Defy.
In short, if you can afford to, I would recommend the cold-turkey approach as I did.
Is there a tl;dr for this? Should I buy one too?
I can’t and won’t ever answer the second one, because I’m not a tech YouTuber. 😄
What I can say is that Defy is an extremely expensive device. It’s a keyboard that is 5 times more expensive than regular gaming keyboards and those are 5-10 times more expensive than a no-name keyboard. I just glanced at Amazon and there is an $8 plastic keyboard that is also capable of making letters appear on a screen. This one starts from $329 today and easily reaches $500 as you add wireless, tenting etc.
On the other hand, I spend 8-12 hours a day in weekdays, using a keyboard. I use one for work, for life, and for entertainment. I don’t nearly interact with most other items in my home, as much as I do with the ones that I have on my desk.
I genuinely feel like this keyboard has made my day-to-day significantly more ergonomic, comfortable, enjoyable, and dare I say.. possibly healthier.
I find it very much worth it to invest in what I see as an important tool and an interface to a big portion of my life. Yet your mileage may vary.
Bugs and downsides
I wrote so much on Defy as that’s the keyboard I use and have experience with, though I wouldn’t want this post to be some kind of blanket endorsement of the product.
Dygma people seem to be nice, and I’m happy with Defy. Yet Defy also has its downsides, some of them may prove to be dealbreakers to you. Some of those that come to my mind are:
- Battery life is pretty bad, especially if you have LEDs on. You’d think a keyboard on a 2370 mAh battery could go a pretty long way, in reality I find myself charging them every three days or so.
- While firmware is technically open source, there is next to zero traction on Dygma’s fork of Kaleidoscope, as one may expect. At the moment there are some bugs and a ton of feature requests piled up in Dygma’s desk, and development pace has been very, very slow. At this speed I don’t really expect Dygma to be able to compete with open source offerings in functionality or stability any time soon.
- There seems to be some QA issues with their products. I personally haven’t had any issues in my one year of use, but have seen plenty of keyboards with broken keycaps and tenting legs in their Discord. Of course this is heavily negatively biased as people don’t come to write “my tenting legs haven’t broke today!” (mine haven’t) and we don’t have stats on how often those issues happen. For now Dygma’s support seems to be excellent in replacing and solving those issues.
- Dygma isn’t as established as, say, Kinesis in this market. One day they could go out of business, or being nice may prove to be too expensive. Without replacement parts, a $500 keyboard may become a very expensive paperweight.
Ultimately, nothing is perfect. If this blog post is the first time you are meeting this kind of keyboards, bear in mind that Defy is far from being the only player in the market. There are hundreds of different models, at varying prices and with different functionality.
In my opinion some strong contenders to Defy are:
- Glove80: Has a “key well” where the base of your keyboard is not flat and individual keys have a depth to themselves, similar to Kinesis keyboards. This is supposed to be more ergonomic, though also comes at the cost of switches not being hot-swappable. Runs on QMK open source firmware which is really nice, but that also means it doesn’t have Wireless over RF, which was a deal-breaker for me with my gamery ways. There is an excellent review of it on Fatih Arslan’s blog.
- Kinesis Advantage360: Similar upsides and downsides to Glove80 from my perspective, though it has the advantage of Kinesis being the most reputable manufacturer of such keyboards, being around since 1991.
- DIY rolling your own keyboard: There are thousands of different designs, guides and such out there, on how to get each component on your own and build your own thing. Since it’s your very own keyboard the layout can be exactly the way you like, and you can add and remove features as you want. Some add little screens, knobs, and touchpads, some go for the lightest, most barebones options.
- Depending on how your project goes this can come significantly cheaper, or expensive at the end. It makes the best sense if you consider it as a fun project to do yourself and learn along the way. If what you want is just the keyboard, it’s hard to justify the time and effort considering DIY ones aren’t exactly cheap either.
The end
If you made it all the way to the end, thanks for reading my book^H^H^H^H blog post on ergonomic keyboards.6
-
Like these guys: https://www.reddit.com/r/ErgoMechKeyboards/ ↩︎
-
Dygma calls these “superkeys”. ↩︎
-
Because I never remember what key is HDR key. I had to look it up just now to tell you, it’s
Windows Key + Alt + B. (I guessHwas taken?) ↩︎ -
I remember “gaming keyboards” selling the ability to disable Windows key as a feature. :) ↩︎
-
Sorry! ↩︎
-
Fun fact: When I first started writing this post it was titled “Dygma Defy – one month with the ergonomic split keyboard”. Next iteration it was “six months with the ergonomic split keyboard”. I’m happy that I’ve finally managed to publish this post even if a year later than I originally thought. ↩︎