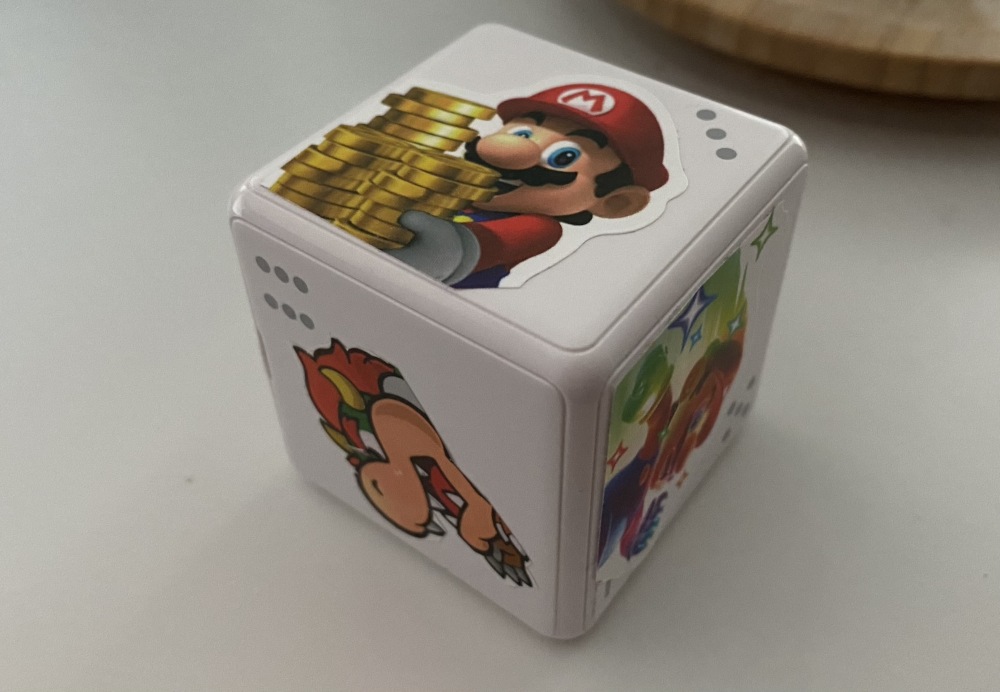
Smart Cube as it sits on my desk
Time tracking software never really worked for me.
Manual ones were a pain because I had to remember they existed, and that extra click or two just wasn’t intuitive enough for me to keep coming back.
Automatic ones were also a pain because they often miscategorized activities, and in their attempts to be clever, they often introduced more work for me.1
For a while I opted to (mis)use jrnl.sh as a time tracking solution, which clearly wasn’t what it was designed for, though I preferred this because it was the quickest way to log something.
Then one day I saw the “time tracking cubes” and thought maybe I finally found my “endgame” time tracking solution. Then I noticed their price tags, subscriptions and proprietary software and I despaired.
What’s a time tracking cube?
A time tracking cube is basically a physical cube that stands on your desk, and reports which of its six sides is facing upwards to a time tracking software. You put an activity of your choosing on each side, mark it with a marker or put on a sticker, and then simply log time by changing which face is up.
If my description of it wasn’t helpful enough for you to visualize, here’s a short advertisement of one such product on the market:
To me, this idea was powerful. It would be a physical tool, instead of a program that I will minimize and eventually forget. It would be quicker and have less friction to switch between activities. Also there’s something satisfying in grabbing the cube and interacting with it.
As for its other technical capabilities, the one I have also supports some gestures, and can report if you’re rotating the cube (counter-)clockwise, or if you’re holding, shaking or tapping it.
I don’t remember where I’ve seen the idea for such a thing first, it was most probably either Timeular or Timeflip. Though I didn’t go with either of them in the end, and instead opted to hack one together myself.
How do I use my cube?
I have this cube sitting on my desk, and it has a different Super Mario sticker on each side. Somehow I ended up with an abundance of Super Mario stickers, and this is a great use.
Each side has a meaning, when I change from one activity to another, I simply take the cube and leave that side up. The cube knows which side is up, and sends the data to my home server, which ends up being kept in InfluxDB.
Here’s each side and what they mean, for inspiration:
- Idle/Free: for times when I’m simply not logging, or not at my desk.
- Focused work: high quality, good, focused work.
- Interruptions & Errands: low value drudgery of any kind.
- Admin: planning, communication/meetings, overhead that is necessary.
- Gaming: self-explanatory.
- Personal improvement: reading a good article, some documentation, learning a language, trying out something new, etc.
Whenever I want, I just go and check my dashboard in InfluxDB, and have down-to-the-second detail on my activities. ✅
The Recipe
The trick is to tape together open source software and cheap hardware. I found this ZigBee-enabled cube somewhere in the depths of Amazon: Aqara Cube T1 Pro for around 25€. I looked it up, and learned that it was already supported by the awesome zigbee2mqtt, and thus Home Assistant duo. If you don’t use them already for smart home stuff, then this recipe won’t make sense.
Here are the ingredients ➡️
- A computer (mine is an Intel NUC) with a USB ZigBee Antenna
- HomeAssistant and Zigbee2MQTT running on your computer
- Aqara Cube T1 Pro
- 100 Pack of Super Mario stickers (optional)
This Cube, while being perfectly capable, wasn’t actually meant to be a time tracking device. Its actual use case as an IoT device, was to replace standard ZigBee remotes with a more gimmicky one, and control lights and switches and so on. I didn’t really care for that.
What is important for us, is that it reports which side is up in HomeAssistant as an entity named *_side as a simple number between 1-6. From there on, we can build on top of it.
I first added the Cube to zigbee2mqtt, which already made it report which face is up through sensor.aqara_cube_control_side entity 2. Then I had to decide which side is which, and for that I simply made use of Template integration to translate each side to something more meaningful:
template:
  - sensor:
      - name: "Focus Mode"
        state: >
          {% if is_state('sensor.aqara_cube_control_side', '1') %}
            free
          {% elif is_state('sensor.aqara_cube_control_side', '2') %}
            development
          {% elif is_state('sensor.aqara_cube_control_side', '3') %}
            admin
          {% elif is_state('sensor.aqara_cube_control_side', '4') %}
            improving
          {% elif is_state('sensor.aqara_cube_control_side', '5') %}
            gaming
          {% elif is_state('sensor.aqara_cube_control_side', '6') %}
            errand
          {% else %}
            unknown
          {% endif %}
Tell me this wasn’t easy.
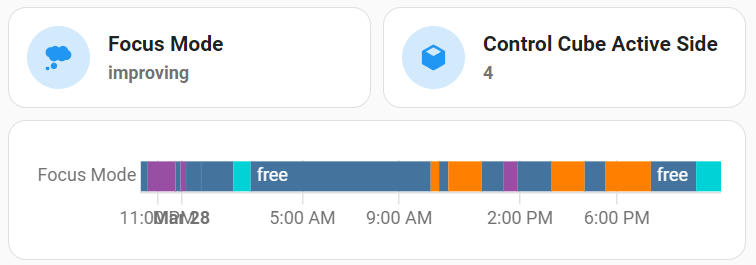
After that I took out my 100 pack of Super Mario stickers I got from Amazon for 8€, and had to decide which ones were the most representative of each activity 3. Then I cut each sticker down to fit the cube’s faces. Finally, I added my new sensor.focus_mode to my HomeAssistant dashboard, and I was done:

Focus widget in my Home Assistant dashboard
Now whenever I grab the cube and change the face, it’s immediately known by HomeAssistant and recorded.
As a nice little side effect, once your HomeAssistant knows what you’re up to, you can build even more automation around it: Maybe turn up the volume of your speakers and dim the room while gaming? Put on some music while doing errands?
One idea I have is to stick a RasPi 2 I had lying around to my new monitor, and control its brightness over the network with a little custom Go HTTP service and DDC/CI. Whenever I’m gaming I want brightness to cranked up, whenever I’m working I need it to be lowered.4
That’s it. Enjoy your little time tracking companion! ✨
Bonus: Keeping history
One little issue with this setup: Home Assistant by default keeps only 10 days worth of data, and querying data within HA doesn’t always spark joy.
The way I handled this is to simply use Home Assistant’s InfluxDB integration. I chose InfluxDB because it’s a well-known TSDB, supported by HA, and came with dashboards already so I wouldn’t have to run Grafana.
I won’t go into setting up InfluxDB as it’d be quite out of scope for this post, in short what I did was:
- Create a
homeassistantbucket and a token for Home Assistant in InfluxDB. - Set up the InfluxDB integration in Home Assistant with
configuration.yaml, about 10 lines of configuration. - Once measurements started appearing, made a nice little dashboard out of it.
-
Maybe in the LLM era there might be better products in this area now? ↩︎
-
Naming is because I named mine
aqara_cube_control. Yours will be different. ↩︎ -
On my cube I represent errands and interruptions with Bowser. ↩︎
-
It turns out once you accumulate enough tech in your life, you can build new stuff just by dumpster diving at home. Which turns out to be the entire theme of this blog post. ↩︎